
Monday, January 26, 2009


Saturday, January 24, 2009
Filters Basics
Filter
A special effect applied to a image.Filters are a feature of Photoshop that gives it such power. No longer are you limited to what you can draw, paint, or import from a digital camera. You now can do RADICAL things to your images and create works of art that seem like MAGIC.
Filters can do a wide variety of things. Some simply add a slight film grain, or remove dust from a photo. Others filters can give a photo the look of an oil painting or a colored pencil drawing. Still more powerful filters can run your images through a meat grinder, wrap it in plastic wrap, or press it into wet sand.
Filter Categories
Artistic- Painterly or artistic effects; Cutout, Fresco, Plastic Wrap
Blur- softens a selection, for retouching
Brush Strokes- Creates a variety of painting effects; Angled Strokes, Splatter, Sui-e
Distort- Geometrically distorts an image; Glass, Ocean Ripple, Pinch
Sketch- add or remove noise, dust or scratches; Despeckle, Dust and Scratches, Reduce Noise
Pixelate- breaks the image down into little dots or cells; Facet, Mosaic, Pointillize
Render- creates clouds, light effects; Clouds, Difference Clouds, Lens Flare
Sharpen- focuses blurred images; Sharpen, Sharpen More
Sketch- Adds texture to an image as if drawn in a different medium; Charcoal, Conte, Chrome
Stylize- Produces radical effects that extremely effect the image; Emboss, Extrude, Find Edges, Glowing Edges.
Texture- Gives the appearance of depth or substance, Craquelure, Patchwork, Texturizer
Filters are powerful but are also tricky. You have to learn what they all do, how much is enough and when you have gone too far. Today we will start to explore filters and their limitless possibilities. Look at the magazine cover below. It was made in Photoshop. You too will create a stylish magazine cover using a photo altered by filters.

Apply a filter
1- Choose the area you want to apply the filter to:- To apply a filter to a portion of a layer, use either the Wand or Lasso tool to select the desired area.
To apply a filter to an entire layer, deselect any selected areas (Command+D), and then select the layer in the Layers palette.
-
To use the Filter gallery, choose Filter>Filter Gallery, select a category, and click the filter you want to apply.
-
To use the Filter menu, choose Filter, then choose a submenu followed by the filter you want to apply. If a filter name is followed by ellipses (…), a Filter Options dialog box appears.
4- If available, select the Preview option to see what the filter will look like before you apply it.
5- Depending on the filter and how you are applying it, use one of the following methods to preview the filter:
-
Use the + button or - button under the preview window to zoom in or zoom out.
-
Click the zoom bar (where the zoom percentage appears) to choose a zoom percentage.
-
Click-drag within the preview window to center a specific area of the image in the window.
Note: A blinking line beneath the preview size indicates that the preview is being rendered.
6- When you are satisfied with the results, click OK.
7- Remember to save your work as a JPG when complete.
8- Submit finished work to the blog. Name the entry name_filterbasics
Thursday, January 22, 2009


Tuesday, January 20, 2009

Monday, January 19, 2009


Friday, January 16, 2009

Thursday, January 15, 2009
Selection Tools
| |||||
| Marquee Tool
| Move Tool
|
| |||
| Lasso Tool
| Quick Selection Tool
|
| |||
| Magic Want Tool
| Eyedropper Tool
| ||||


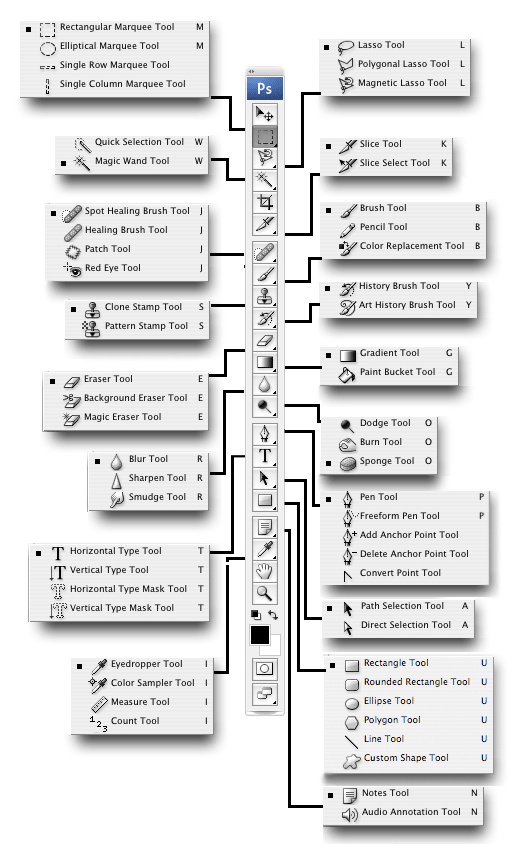
Lasso Tool
During this lesson we will take a photo of a person and remove the background using the Lasso tool.
It helps to use a photo with a distinct edge. Use a digital camera and take a photo of someone in front of the white bricks out in the hallway. This makes for a perfect candidate for the Magnetic Lasso Tool because the background will be uniform.
We will start with the Magnetic Lasso for the initial selection and learn how to clean up the selection with a Quick Mask. Later we can reposition the person on a new background. With these skills we can place people in humorous locations, the moon, an erupting volcano or at the Superbowl.
In later lessons we will learn other techniques for remove backgrounds including the Background Eraser and the Pen Tool.
 The Magnetic Lasso tool detects and snaps to the edge of an object as you to trace along its outline. As you drag along the edge of an object, the tool drops fastening points to anchor the selection.
1- Take a moment to play with the Magnetic Lasso tool. Notice how you can create your own anchor by clicking the mouse.
2- Try opening your photo_in_text.jpg file and selecting your text by tracing it with the Lasso.
3- When you feel comfortable, move on to the Removing a Background lesson.
Now we are ready to rock and roll. You should already have your photo taken and uploaded to your computer.
1- Open the photo in Photoshop CS3.
2- Using the Magnetic Lasso drag along the edge of an object. The tool will create a selection line along the path as you go. At key edges you may drop your own anchor by clicking the mouse.
!!! If you get an anchor that is out of position, do not freak! Just click on the DELETE key and it will step back a step.
3- Once you have come completely around the figure, click once to close the selection. You know have your person selected. You will undoubtedly find little places where the Lasso missed a spot or two. We will fix that in the steps 4-8.
As you can see, the Magnetic Lasso was not perfect. It sometimes fails to detect the object around complicated spots like the hair. We can correct this fairly easily by zooming in and switching to Quick Mask mode.


 A Quick Mask
In quick mask mode, your image is displayed with a red overlay. It represents the masked area. In this mode, your tool palette only displays white and black for the foreground and background colors. Painting with white takes away from the ruby overlay to subtract from the mask, and painting with black adds to the ruby overlay to add to the mask.
4- Click on the Quick Mask button on the toolbar to switch into quick mask mode.
5- Zoom in to where your image needs correcting.
6- Painted away the ruby overlay to reveal the parts of the subject that need to be included in the selection.
!!! Tap the space bar to temporarily bring up the Hand tool to nudge the image over if you come to the edge of the screen.
7- While still in Quick Mask mode apply a half-pixel Gaussian Blur to the mask just to soften the edge the slightest bit. Any filters you apply in quick mask mode will only effect the mask and not the image itself. Filter> Blur> Gaussian Blur
9- In the photo layer choose Selection>Invert and the
10- Press delete on the keyboard to remove the old background.
11- Save the image as background_cutout.psd before moving on.
Now its time to insert the subject in a new background. This shouldn't be a problem if you remember how to drag a photo onto an image like you did in the Photo In Text lesson.
1- Open the photo you wish to use as your new background.
2- In the photo layer of your background_cutout.psd project, use the Move tool to drag the figure onto your background.
3- Resize your figure using Command>T. You can hold down SHIFT to constrain proportions while resizing.
4- When finished, save as jpg.
It helps to use a photo with a distinct edge. Use a digital camera and take a photo of someone in front of the white bricks out in the hallway. This makes for a perfect candidate for the Magnetic Lasso Tool because the background will be uniform.
We will start with the Magnetic Lasso for the initial selection and learn how to clean up the selection with a Quick Mask. Later we can reposition the person on a new background. With these skills we can place people in humorous locations, the moon, an erupting volcano or at the Superbowl.
In later lessons we will learn other techniques for remove backgrounds including the Background Eraser and the Pen Tool.
Lasso Practice
The Magnetic Lasso tool detects and snaps to the edge of an object as you to trace along its outline. As you drag along the edge of an object, the tool drops fastening points to anchor the selection.1- Take a moment to play with the Magnetic Lasso tool. Notice how you can create your own anchor by clicking the mouse.
2- Try opening your photo_in_text.jpg file and selecting your text by tracing it with the Lasso.
3- When you feel comfortable, move on to the Removing a Background lesson.
Selecting the Subject with the Lasso
Now we are ready to rock and roll. You should already have your photo taken and uploaded to your computer.
1- Open the photo in Photoshop CS3.
2- Using the Magnetic Lasso drag along the edge of an object. The tool will create a selection line along the path as you go. At key edges you may drop your own anchor by clicking the mouse.
!!! If you get an anchor that is out of position, do not freak! Just click on the DELETE key and it will step back a step.
3- Once you have come completely around the figure, click once to close the selection. You know have your person selected. You will undoubtedly find little places where the Lasso missed a spot or two. We will fix that in the steps 4-8.
Cleaning Up the Background with a Quick Mask
As you can see, the Magnetic Lasso was not perfect. It sometimes fails to detect the object around complicated spots like the hair. We can correct this fairly easily by zooming in and switching to Quick Mask mode.
A Quick Mask In quick mask mode, your image is displayed with a red overlay. It represents the masked area. In this mode, your tool palette only displays white and black for the foreground and background colors. Painting with white takes away from the ruby overlay to subtract from the mask, and painting with black adds to the ruby overlay to add to the mask.
4- Click on the Quick Mask button on the toolbar to switch into quick mask mode.
5- Zoom in to where your image needs correcting.
6- Painted away the ruby overlay to reveal the parts of the subject that need to be included in the selection.
!!! Tap the space bar to temporarily bring up the Hand tool to nudge the image over if you come to the edge of the screen.
7- While still in Quick Mask mode apply a half-pixel Gaussian Blur to the mask just to soften the edge the slightest bit. Any filters you apply in quick mask mode will only effect the mask and not the image itself. Filter> Blur> Gaussian Blur
8- After applying the blur effect switch back into selection mode by pressing Q or using the toolbar toggle button.
Removing the Background
9- In the photo layer choose Selection>Invert and the
10- Press delete on the keyboard to remove the old background.
11- Save the image as background_cutout.psd before moving on.
New Background
Now its time to insert the subject in a new background. This shouldn't be a problem if you remember how to drag a photo onto an image like you did in the Photo In Text lesson.
1- Open the photo you wish to use as your new background.
2- In the photo layer of your background_cutout.psd project, use the Move tool to drag the figure onto your background.
3- Resize your figure using Command>T. You can hold down SHIFT to constrain proportions while resizing.
4- When finished, save as jpg.
Wednesday, January 14, 2009


Tip: Managing Layers
Here is a good tip if you keep having troubles with layers. Its easy to get confused about what layer you are working on or which one you need in a pinch. So, to make things less complicated, double click on each layer and rename them to describe what they are.
Also, to unlock the BACKGROUND layer and make it editable, simply double click on it and Photoshop renames it Layer 0. Now you can drag it around, edit it, even delete it if you wish.
Also, to unlock the BACKGROUND layer and make it editable, simply double click on it and Photoshop renames it Layer 0. Now you can drag it around, edit it, even delete it if you wish.
Tuesday, January 13, 2009

Friday, January 9, 2009


Subscribe to:
Posts (Atom)